Tinting is a fun modification skill -- you can completely change the look of your things almost instantly, or match colors easily.
Always practice on something copyable first!
First to give you an overview of tinting, here is a great little video tutorial on tinting clothing from the creator of Icing clothing:
Always practice on something copyable first!
First to give you an overview of tinting, here is a great little video tutorial on tinting clothing from the creator of Icing clothing:
TO TINT the WHOLE OBJECT
This is the easiest thing to do -- BUT you never want to do it by accident (I once tinted someone's entire house green. Oops.).
- Right Click the object and go into Edit > Texture tab
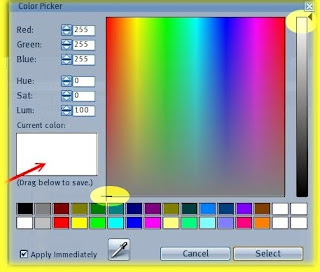
- Click on color square (on the right) so that the color window comes up.
- Click a color square at the bottom closest to what you want.
- Move the crosshairs (in the big square at the top) around to adjust color : near the top are brighter colors, more subtle as you move down.
- To darken or lighten, move the slider on the right up and down.

TIP: If you want to have NO color, choose white.
TO TINT ONE WHOLE PRIM
- Edit> check the EDIT LINKED PARTS box.
- R-Click a prim. then hold down the SHIFT key and click on all other prims you want to tint.
- Go to the Texture Tab
- Click on color square (on the right) so that the color window comes up.
- Click a color square at the bottom closest to what you want.
- Move the crosshairs (in the big square at the top) around to adjust color : near the top are brighter colors, more subtle as you move down.
- To darken or lighten, move the slider on the right up and down.
Tip: To tint more than one prim (eg Several pillows at a time), for step #2, hold down the shift key and click each prim you want to select.
TO TINT ONLY CERTAIN FACES (SIDES) OF A PRIM
- EDIT check SELECT TEXTURE (or FACE, depending on your viewer)
- TOUCH (L-Click not R-Click!) the face (side) of a prim you want to change. (Hold down the SHIFT key to choose multiple faces simultaneously.)
- Go to the Texture Tab
- Click on color square (on the right) so that the color window comes up.
- Click a color square at the bottom closest to what you want.
- Move the crosshairs (in the big square at the top) around to adjust color : near the top are brighter colors, more subtle as you move down.
- To darken or lighten, move the slider on the right up and down.

TO MATCH COLORS EXACTLY
This is useful when you want several things to have the same tint. There's more than one way; here Torley explains how to use the eyedropper:
SHORTCUT: My usual way is to select the faces or prims I want to tint a certain color (by holding down the shift key and selecting them all), then last of all selecting the face with the tint I want to match. Then I open the color window and choose select.
Follow the instructions above for selecting an object, prim, or face, then go to the Texture Tab and increase the ALPHA / TRANSPARENCY level (at the top right) -- to make it invisible, go to 100%.
TO ALIGN TEXTURES: http://community.secondlife.com/t5/Tips-and-Tricks/VIDEO-Align-planar-faces-for-easier-texture-mapping-in-Viewer-2/ba-p/669471
FOR MORE GREAT VIDEO TUTORIALS: http://secondlife.com/my/whatnext/video-tutorials/
TO MAKE SOMETHING TRANSPARENT
TO ALIGN TEXTURES: http://community.secondlife.com/t5/Tips-and-Tricks/VIDEO-Align-planar-faces-for-easier-texture-mapping-in-Viewer-2/ba-p/669471
FOR MORE GREAT VIDEO TUTORIALS: http://secondlife.com/my/whatnext/video-tutorials/
